
Now, there are many ways to carve a pumpkin, so I would not dare infringe upon an excursion that you are planning for the near future, but I thought that it would be fun of me to share my own escapade with you in hopes of giving you more ideas for a fun, exciting pumpkin adventure.
It all started with a boring night at 192 Bay State Road, my resident brownstone, where I was sitting in my room, wearing my pajamas, chugging some coffee, and stressing about my upcoming (and past…oops) homework assignments. It was a busy week though, and everyone is deserving of a break after a busy week like the one I had just endured. As midnight rolled around, I came up with an idea: I wanted to carve a pumpkin! I had never carved one before. It was time!
“‘The time has come,’ the Walrus said,
‘to talk of many things:
Of shoes–and ships–and sealing-wax–
Of cabbages–and pumpkins!‘”
Wait, that’s not right…sorry Lewis. But you get the idea.
So begins Phase 1: A Companion for the Road
I mean, a pumpkin escapade could be fun on your own, but choosing one friend to share it with calls for many fun inside jokes and shared memories in the future.
“Remember when we had to roll that pumpkin down Comm. Ave. at 3am because it was too heavy to carry?”
“Seriously! Why couldn’t it just turn into a carriage like a normal pumpkin?”
No, that conversation didn’t actually happen, but it could. Anyway, end of tangent. I will advance to Phase 2: Seeking Pumpkin.
 At midnight (on a school night, of course), I hitched up my pajamas (because why would I bother putting actual clothes back on…seriously. Who does that?), threw on a sweatshirt and some flip-flips (yes, flip-flops are appropriate attire in October! Don’t judge me!), grabbed my boyfriend Adam, and skipped down Commonwealth Avenue towards Shaw’s, the best place to buy a pumpkin at 12am.
However, as implied in the made-up dialogue above, you must make sure you are equipped for such a journey (and I’m not just talking about my fabulous choice of outfit either). This means bring a backpack! Pumpkins get heavy. I mean, have you ever seen someone go on a journey without a backpack? It just doesn’t happen.
Phase 3: Picking the Proper Pumpkin
Now, I don’t know about your encounters with Shaw’s, but I have definitely found moldy produce there. Check for white/yellowish-brown spots…maybe give the pumpkin a sniff, just for kicks. Make sure it’s something you can carry (aka, fit in your backpack), unless, of course, you are fortunate enough to have a car (in which case, we will all glare at you right now). At the same time, it shouldn’t be too small…make sure, you know, you can fit something in there…
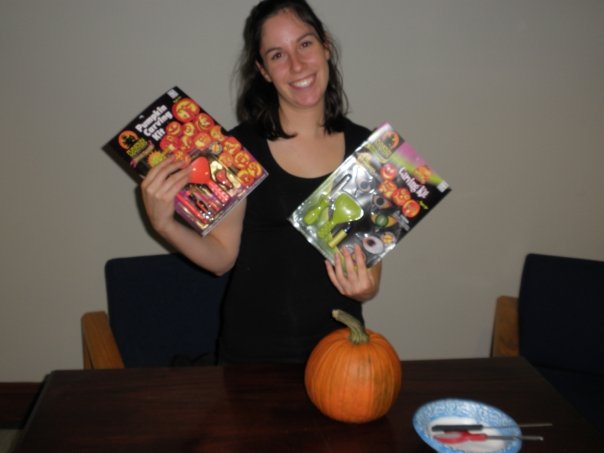 Ehem, anyway, take that fabulous pumpkin, hit the register, and bag that thing! While you are at Shaw’s, you should also pick up a handy dandy pumpkin carving kit, featuring not only carving supplies, but also different pictures that you can use as carving templates. They make your pumpkin carving experience a lot easier (and safer…no, you do NOT want to carve a pumpkin with a blow torch!)
Phase 4: Preparing to Carve that Pumpkin
Now that you’ve got your pumpkin and supplies, it’s carving time! Head back to your apartment/brownstone/dorm and pick a spot that you don’t mind getting a little bit dirty. For me, it was off to the basement of Adam’s brownstone– 204 Bay State Road, where I had a nice, flat surface ready, a roll of paper towels, and a garbage can (with a garbage bag…trust me, you don’t want to be cleaning that up later).
Phase 5: Takin’ Out Those Insides
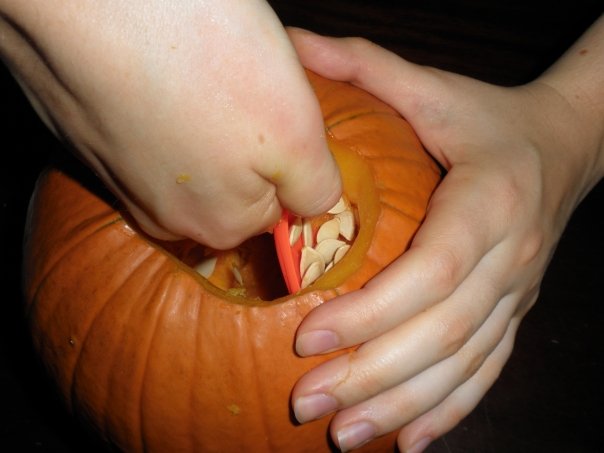 So Adam and I were sitting there, everything ready, pumpkin on the table, pumped, and ready to go. In order for your pumpkin to be carve-able, you first need to make it hollow. This is where I got out my handy dandy pumpkin carving kit, took out the little knife-looking tool, and sawed a nice-sized hole around the stem…because, you know, your hand’s gotta go in the hole.
Next, you stick your hand in there (I’m sorry! There’s no other way to say it!) and scoop out those fun insides. I mean, once I got all those seeds and easy stuff out by hand, I switched to the tools, but otherwise, hands are the way to go. I’m telling you, it was a great workout (oh geeze…it’s not just me, is it?). You may want to switch off scooping with your friend, because it seriously gets exhausting. Don’t make the opening too thin, because you still want the lid to fit back on.
Phase 6: Finally! The Carving!
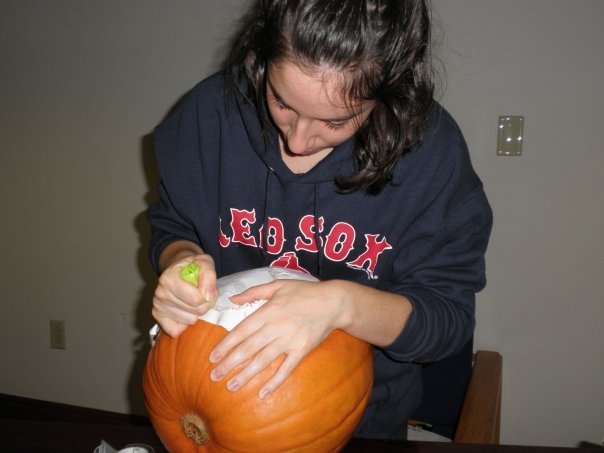 I was very proud of my hollow pumpkin. It almost cost me a finger, but, you know, worse things have happened. It just looked like I started painting early, that’s all. (I mean, imagine what would have happened if I had used that blow torch…)
Now, I don’t always like following directions, so I kind of did things my own way. I picked a design from my wonderful carving kit and taped that design on to my pumpkin. Then, I used my friend, Mr. Knife, to cut along the design, being very careful not to move the paper around or, most importantly, cut my finger.
Phase 7: Admire Your Work
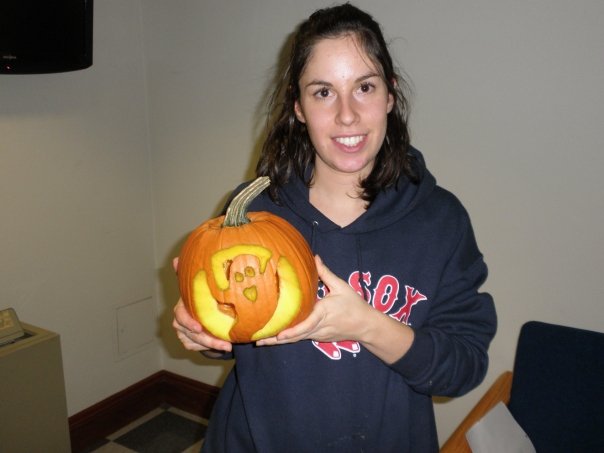 Finally, assuming you’ve listened to me (because you all have, right? RIGHT?), and assuming you’re not too artistically challenged (in which case, I take no responsibility!), you should have a nice, beautifully carved pumpkin. Hurray team!
(Optional Phase 8): Painting Your Pumpkin
Although my journey sadly came to a close here, yours doesn’t have to! Blick sells paint! (though unfortunately, not at 3am, but you can always go the next day. You would probably be covered in pumpkin seeds anyway, so showering may be a good idea first.) Therefore, if you feel like your pumpkin still needs a special touch, head over to Blick and buy yourself some paint to jazz that pumpkin up a bit.
Happy Carving!
Thank you to Adam Korn, for going with me on my excursion and taking these photos.
One Comment on “How to Carve a Pumpkin: A Pumpkin Escapade”