

 It is no secret that sculpted cakes have taken the baking world by storm. Everywhere you turn there is a new TV show or challenge daring bakers and decorators to create edible sculptures. While you won’t become Duff Goldman overnight, you can use this tutorial to build your own airplane cake!
Before you begin to sculpt, you will need to buy or make the cake and frosting. I used my favorite chocolate cake recipe and a vanilla buttercream. A boxed cake mix and white canned frosting will substitute just fine. For my cake, I only used one 8-inch round cake and about 2 cups of frosting. However, most recipes will yield 2 8″ round cakes, so bake them both in case you make a mistake with the first one. Now-to the fun part.
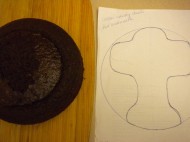
1. Trace the bottom of your cake pan onto a piece of paper. Draw the basic shape of the airplane within the circle.

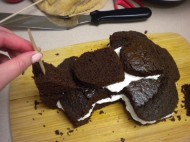
2. Cut out the airplane and place it on top of the cooled cake. Using a serrated knife, cut around the outline. Try to keep the scrap pieces as large as possible if you want to use them to build the rest of the cake. If not, you can cut out whatever you need from the second 8″ round cake. Save yourself a headache and begin building the cake on the same surface you will serve it on.
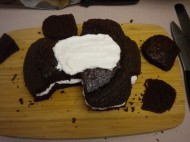
3. You have the option of cutting the cake in half horizontally to add an extra layer of frosting. To do so, use a serrated knife and try to keep the cut in the middle throughout the entire cake. Then add another layer of frosting on top of the cake to act as glue. Using scraps or the extra 8″ cake, cut out a rounded-edge rectangle to add height to the body of the airplane.
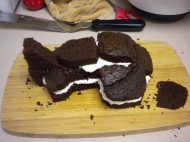
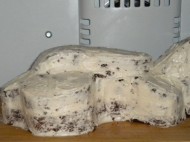
4. Cut out a triangle for the vertical stabilizer on the back of the plane. Attach the triangle with more frosting.
5. To add extra support to the vertical stabilizer, insert a wooden dowel or popsicle stick from the top to the bottom of the cake. Insert a second dowel horizontally.
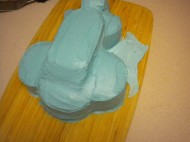
6. Give the entire cake a crumb coat. This is a very thin layer of frosting with the purpose of sealing in the crumbs before you add the final layer of frosting. A crumb coat is especially important if you are using chocolate cake. After applying the crumb coat, put the cake in your freezer for about 10 minutes.
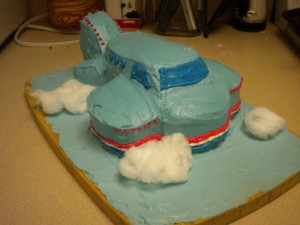
7. Cover the cake with the final layer of frosting. Add a layer of light blue frosting to the surface to look like the sky.
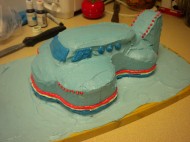
8. Add windows, lights and whatever other details you like to your airplane.
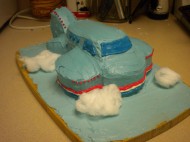
9. For a finishing touch, use cotton candy (or cotton balls) for clouds.
One Comment on “How to Build an Airplane Cake”